织梦网站模板怎么安装政协网站建设
文章目录
- 前言
- 数据架构的演变
- 关系型数仓
- 数据湖
- 现代数仓
- 数据网络
- 数据湖仓
- 数据网格
前言
在搭建和使用大数据组件前,预先投入时间设计和构建正确的数据架构绝对至关重要。如果在前期没有设计正确的数据架构就开始实施方案,在后期想更改架构设计是十分困难的。
但是又不存在放之四海而皆准的架构,架构没有好坏之分,只有合适与不合适之分,需要根据具体的情况选择最合适的架构。
但是好在目前已经有很多成熟的数据架构方案,本文主要简单介绍多种数据架构类型:关系数据仓库、数据湖、现代数据仓库、数据网络、数据湖仓和数据网格。
数据架构的演变
关系数据库以结构化方式存储数据,数据元素之间的关系由键定义。数据通常组织成表,每个表由行和列组成。每行代表数据的单个实例,而每列代表数据的特定属性。
关系数据库旨在处理结构化数据,它提供了使用称为结构化查询语言或 SQL 的标准化语言创建、修改和查询数据的框架。关系模型最初由 Edgar F. Codd 于 1970 年提出,自 70 年代中期以来,它已成为数据库管理系统的主导模型。大多数操作应用程序都需要永久存储数据,而关系数据库是大多数人选择的工具。
在关系数据库中,一致性和数据完整性至关重要,数据通常采用称为写入时定义 schema。Schemas 是指定义表、字段、数据类型和约束等关系间的元信息。它充当存储和管理数据的蓝图,并确保数据库内的一致性、完整性和高效组织。
关系型数据库(和关系型数据仓)需要一些前期工作才能将数据放入其中。必须创建数据库及其表、字段和 schema 约束,然后编写代码以将数据传输到数据库中。通过定义写入 schema,数据在存储之前必须遵守预定义的 schema,包括数据类型、约束和关系。
相比之下,另一种是读取时定义schema方法,在读取或访问数据时应用 schema,而不是在写入数据时应用 schema。数据可以不需要过多约束条件写入数据库,并且仅在查询或消费数据时才定义 schema。这种方法在存储非结构化或半结构化数据方面提供了更大的灵活性,并且通常用于数据湖,本文稍后将对此进行讨论。
从较高层面上看,数据架构提供了一个框架,用于以支持公司组织内需求的方式组织和管理数据。这涉及定义数据的采集、存储、处理和访问方式,以及维护数据的质量、安全性和隐私性等方面。虽然数据架构可以采用多种不同的形式,但一些常见的方式包括:
-
数据存储
所有数据架构都需要指定数据的存储方式,包括物理存储介质(例如硬盘或云存储)和用于组织数据的数据结构。
-
数据处理
数据架构需要定义数据的处理方式,包括在存储或分析数据之前对数据执行的任何转换或计算。
-
数据存取
数据架构需要提供访问数据的机制,包括支持查询和分析数据的用户界面和应用程序接口(API)。
-
数据安全和隐私
数据架构需要纳入确保数据安全和隐私的机制,例如访问控制、加密和数据脱敏。
-
数据治理
数据架构需要提供管理数据的框架,包括数据质量标准、数据血缘管理和数据持久化策略。
总体而言,数据架构的主要目标是使公司能够有效地管理和利用其数据资产,以支持其业务目标和决策流程。
下表是对不同大数据架构的的一些比较:特征 关系型数仓 数据湖 现代数仓 数据网络 数据湖仓 数据网格 推出时间 1984 2010 2011 2016 2020 2019 数据集中/数据分散 集中 集中 集中 集中 集中 分散 存储类型 关系型存储 对象存储 关系型和对象存储 关系型和对象存储 对象存储 由所在域决定 schema 类型 写时 schema 读时 schema 读时schema和写时schema 读时schema和写时schema 读时schema 由所在域决定 数据安全 高 中低 中高 高 中 由所在域决定 数据延迟 低 高 看情况,从低到高 看情况,从低到高 中高 由所在域决定 价值体现所需时间 中等 少 少 少 少 多 所需成本 低 中低 中 中高 中低 高 支持的使用场景 低 低到中 中 中高 高 高 开发难度 低 中 中 中 中高 高 技术成熟度 高 中 中高 中高 中高 低 人员技能要求 低 中低 中 中高 中高 高
关系型数仓
几十年来,关系型数据库一直是数据存储的支柱。第一个用于生产的关系型数据仓库是 Teradata 系统,由 Jack E. Shemer 博士在斯坦福大学开发,他于 1979 年创立了 Teradata 公司。富国银行于 1983 年安装了第一个 Teradata 系统,并用它来分析金融数据。
随着公司产生越来越多的数据,在没有长时间延迟的情况下处理和分析这些数据变得越来越具有挑战性。关系型数据库的特性促进了关系型数据仓库的发展,大约在关系型数据库出现 15 年后,关系型数据仓库在 20 世纪 80 年代末变得更加流行。关系型数据仓库(RDW)是一种特定类型的关系型数据库,专为数据仓库和商业智能应用程序而设计,具有优化过的查询性能并支持大规模数据分析。虽然关系型数据仓库和事务处理都使用关系模型来组织数据,但关系型数据仓库的规模通常更大,并且针对分析查询进行了优化。
RDW 既有计算引擎又有存储。计算引擎用于查询数据的处理能力。存储是关系存储,它保存通过表、行和列结构化的数据。 RDW 的计算能力只能用于其关系存储——它们是捆绑在一起的。
RDW 的一些最重要的功能包括事务支持(确保数据得到可靠且一致的处理)、审计跟踪(保留对系统中数据执行的所有活动的记录)和schema 实现(确保数据以预定的方式被存放和使用)。
在 20 世纪 70 年代和 80 年代,公司将关系型数据库用于订单输入和库存管理等应用程序。这些应用程序称为_在线事务处理(OLTP)系统。 OLTP 系统可以对数据库中的数据进行创建、读取、更新和删除更改,或者CRUD操作。 CRUD 操作构成了数据架构中数据操作和管理的基础。它们对于设计和实现数据存储系统以及与数据交互的用户界面至关重要。
CRUD 操作要求我们的系统要能够快速响应,虽然我们可以在业务库中进行查询生成报表,但是这会导致我们的系统响应变慢,导致丧失用户信任度。
RDW 的发明就是为了解决这个问题,关系数据库中的数据被复制到数据仓库中,用户可以针对数据仓库而不是关系数据库(业务库)运行查询生成报表。这样业务系统的响应就不会受到影响, RDW 还能采集来自多个应用程序的数据以生成报表: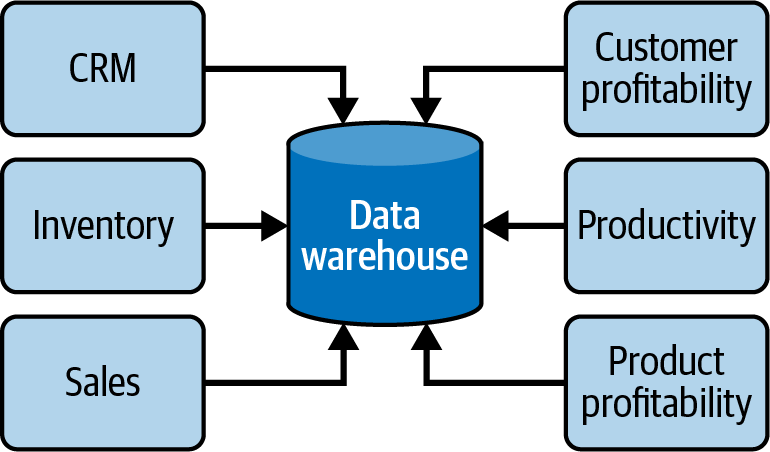
数据湖
数据湖是一个较新的概念,首次出现于 2010 年左右。我们可以将数据湖视为一个美化的文件系统,与笔记本电脑上的文件系统没有太大区别。数据湖只是存储,与关系数据仓库不同,没有与之关联的计算引擎。幸运的是,有许多计算引擎可以与数据湖一起使用,因此数据湖的计算能力通常比关系数据仓库开销小。另一个区别是,RDW 使用关系存储,而数据湖使用对象存储,不需要将数据结构化为行和列。
数据湖存储技术始于 Apache Hadoop 分布式文件系统 (HDFS),这是一种几乎完全在本地存储的开源技术,在 2010 年代初期非常流行。HDFS 是一种可扩展、容错的分布式存储系统,设计用于在商用硬件上运行。它是 Apache Hadoop 生态系统的核心组件。随着云计算的重要性不断增长,数据湖是使用不同类型的存储在云中构建的,并且大多数数据湖现在都存在于云中。
与关系数据仓库相比,数据湖是读时schema,这意味着无需进行任何前期工作即可将数据放入数据湖中:
它可以像使用笔记本电脑上的文件夹将文件复制到其中一样简单。数据湖中的数据以其自然(或原始)格式存储,这意味着它可以从源系统进入数据湖,而无需转换为其他格式。例如,如果我们将数据从关系数据库导出到原始 CSV 格式的文件中,则可以将其原封不动地存储在数据湖中。但是,如果我们想将其存储在关系数据仓库中,则必须对其进行转换以适合表的行和列。
将数据文件复制到数据湖时,其 schema 可能不会随之复制,或者可能位于不同的文件中。因此,我们必须通过创建schema 或从单独的文件中提取 schema 来定义schema,这就是术语读时schema的由来。如下图所示,来自源系统的数据(例如web应用数据库、传感器数据和社交媒体数据)都可以落入数据湖。这些文件可以保存结构化数据(如关系数据库中的数据)、半结构化数据(如 CSV、日志、XML 或 JSON 文件)或非结构化数据(如电子邮件、文档和 PDF 中的数据)。它们甚至可以保存二进制数据(如图像、音频和视频)。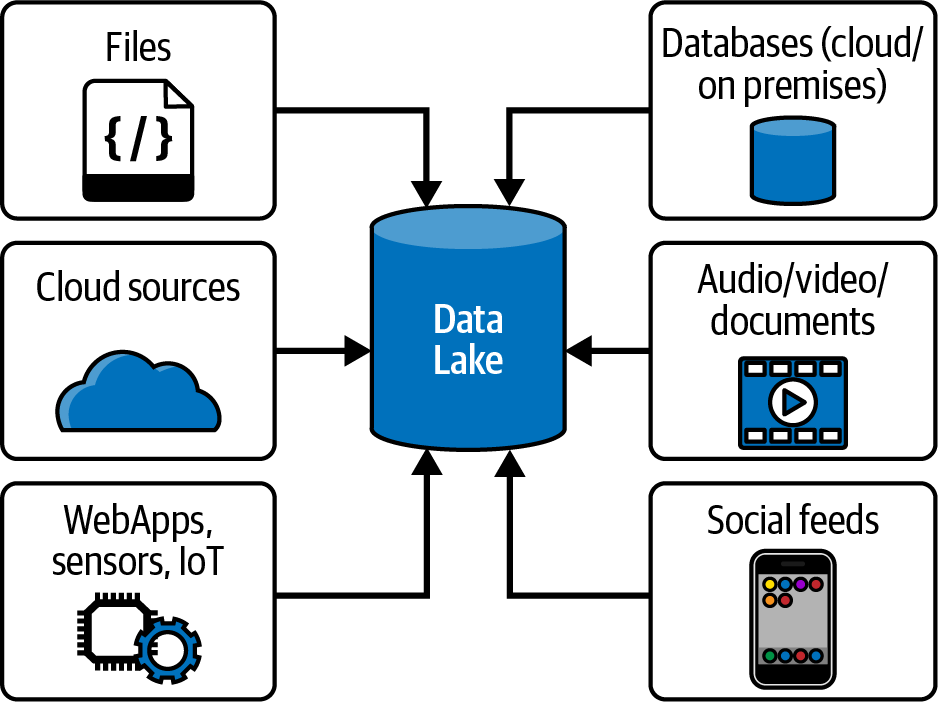
数据湖最初是为了解决关系数据仓库的所有问题,包括成本高、可扩展性有限、性能差、数据清洗开销大以及对复杂数据类型的支持有限。 Cloudera、Hortonworks 和 MapR 等销售 Hadoop 和数据湖的公司对它们进行了大肆宣传,就好像它们是银弹,可以复制和清理数据,并以神奇的方式轻松地将其提供给最终用户。他们声称数据湖可以以“一种技术包揽一切”的方式完全取代关系数据仓库。
问题是查询数据湖实际上并不那么容易:它对人员技能要求高。比如说 IT 部门会告诉其用户:“嘿,我们将您需要的所有数据复制到这个数据湖中了,你只需打开 Jupyter 笔记本,然后使用 Hive 和 Python 使用这些文件夹中的文件构建报表就行了。”但这绝对会遭到吐槽拒绝,因为大多数最终用户根本不具备完成这一切所需的技能。公司后续将会发现,由于硬件和人力支持成本、生产延迟和生产力损失,这些复杂、难以使用的解决方案实际上要花费更多的成本。此外,数据湖不具备人们喜欢的数据仓库的一些功能,例如事务支持、schema 实现和审计跟踪。这导致三大顶级数据湖供应商中的两家——Hortonworks 和 MapR——破产。
但数据湖并没有消失。相反,它的目的变成了另一种不同但非常有用的设计:**暂存和清洗数据,**我会在后续讲解数据湖的文章中详细说明。
现代数仓
数据湖未能取代关系型数据仓库,但仍然为暂存和清洗数据提供了好处。为什么不兼具两者的优点呢? 2011年前后,许多公司开始构建将数据湖与关系型数据仓库并列的架构,形成我们现在所说的现代数据仓库(MDW)的数据架构。现代数据仓库中的现代是指使用最新的技术和方法进行数据仓库构建。
下图为现代数仓架构:
这是一种“两全其美”的方法:数据湖用于暂存和准备数据,数据科学家用它来构建机器学习模型;数据仓库用于服务、安全性和合规性,业务用户用它进行查询和报表生成。
数据网络
数据网络在 2016 年左右开始出现。我们可以将数据网络 架构视为现代数据仓库架构的演变,添加了更多技术来获取更多数据、保护数据并使其可用。此外,系统加载数据、转换、查询、搜索和访问数据的方式也得到了改进。通过添加各种组件,系统变成了一个“网络”——一个可以加载任何类型数据的大型框架。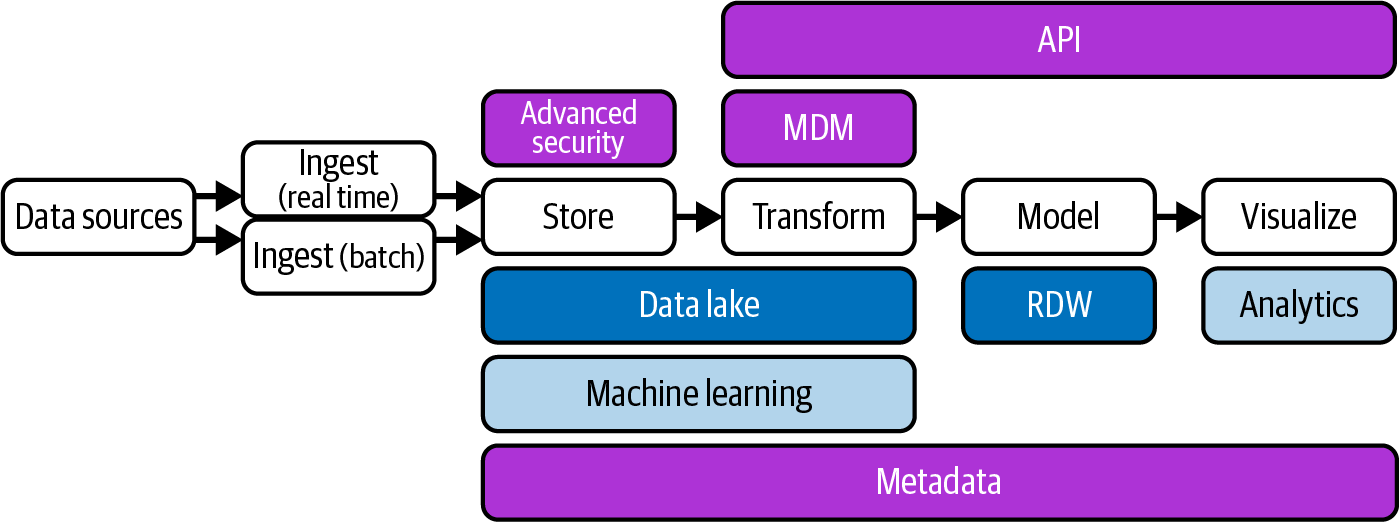
数据湖仓
“数据湖仓”是数据湖和数据仓库的合成词(混合)。数据湖仓架构在 2020 年左右开始流行,当时 Databricks 公司开始使用该术语。 Lakehouse 的概念是摆脱关系数据仓库,并在数据架构中仅使用一个存储库(数据湖)。所有类型的数据(结构化、半结构化和非结构化)都被引入数据湖,并且所有查询和报告都是从数据湖完成的。
为何早期的数据湖失败了,而现在的湖仓一体又兴起了呢,是因为一个名为 Delta Lake 的支持事务的软件存储层,它运行在现有数据湖之上,使其更像关系数据库。该层的开源项目包括 Delta Lake、Apache Iceberg 和 Apache Hudi、Apache Paimon。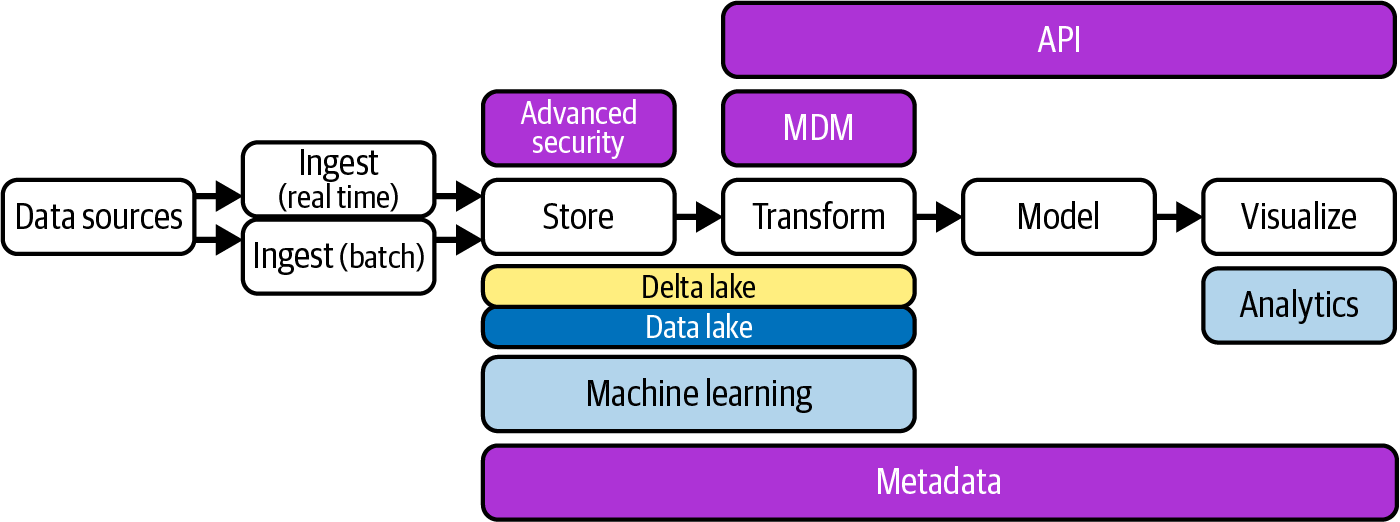
数据网格
数据网格一词最初由 Nextdata 创始人兼首席执行官、《数据网格:大规模交付数据驱动的价值》(O’Reilly,2022 年)一书的作者Zhamak Dehghani 在 2019 年 5 月的博客文章中首次引入。 2020 年 12 月,Dehghani进一步阐明了什么是数据网格,并提出了四项基本原则。从那时起,数据网格架构一直是一个非常热门的话题,在大量的博客、演示、会议和媒体报道中得到讨论,甚至出现在Gartner 数据管理技术成熟度曲线中。数据网格架构有很多值得喜欢的地方,但它只适合少数使用场景。
现代数据仓库、数据结构和数据湖仓架构都涉及集中存储数据:在 IT 控制的架构下将运营数据复制到 IT 拥有的中央位置,然后 IT 在其中创建分析数据(下图****的左侧) 。这种集中式方法带来了三个主要挑战:数据所有权、数据质量和公司组织/技术扩展。数据网格的目的就是解决这些挑战。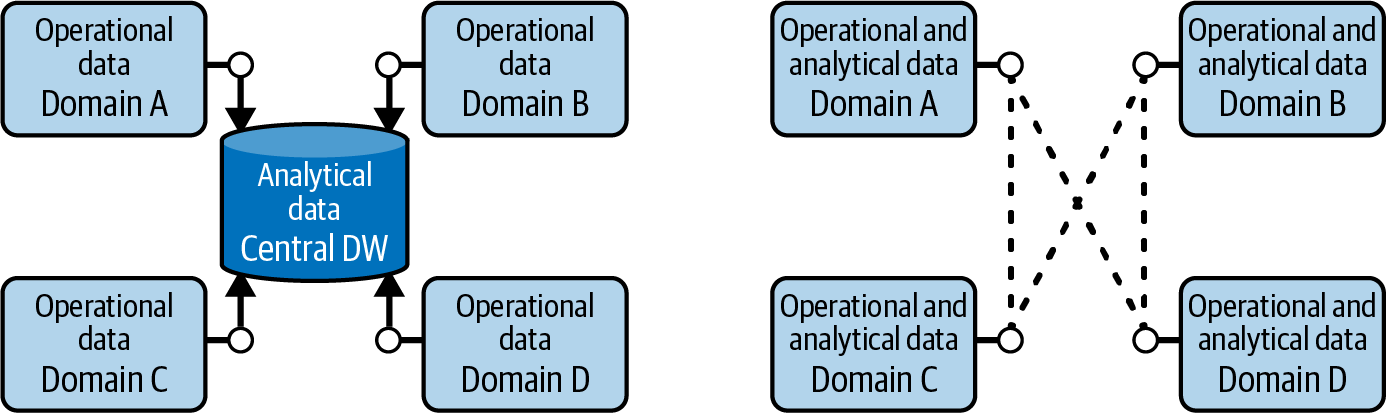
重要的是要理解数据网格是一个概念,而不是一项技术。实施数据网格涉及非常大的公司组织和公司文化的改变,很少有公司会为这个做出改变。 (事实上,大多数公司甚至没有大到足以考虑采用数据网格架构:这在很大程度上是一种需要企业推进的方法。)构建它之前需要确定哪些现有技术可以复用以及哪些部分必须重新改造。每个领域都可以确定将使用哪些技术来构建其数据网格部分,其中可能包括构建现代数据仓库、数据结构或数据湖库。