株洲网站开发公司电话电子商务基础平台有哪些
《汇编语言》- 读书笔记 - 实验9 根据材料编程
- 需求
- 所需的相关知识
- 属性字节每一位的含义
- 分析
- 字符位置
- 属性
- 解答
- 思路
- 代码
- 效果
需求
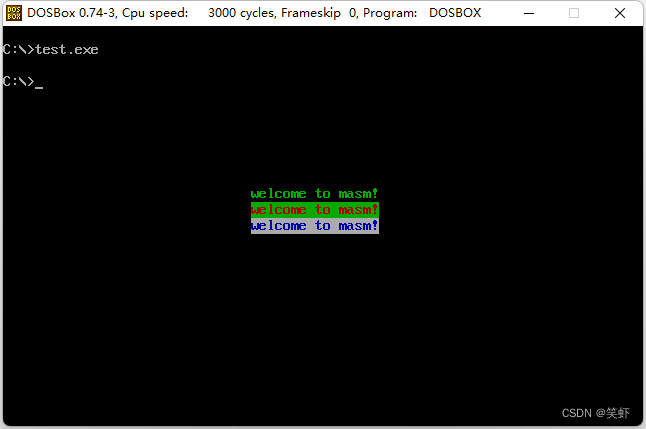
在屏幕中间分别显示 绿色、绿底红色、白底蓝色 的字符串 welcome to masm!。
所需的相关知识
80x25 彩色字符模式显示缓冲区(以下简称为显示缓冲区)的结构:
- 内存地址
B8000H ~ BFFFFH共32KB,为80x25彩色字符模式的显示缓冲区。
1.1. 向这段内存写数据,内容将立即出现在显示器上。 - 显示缓冲区共
32KB,可分为8页,每页内容占4KB(≈4000B)。(这里的页是指显示屏)
2.1. 默显示第0页B8000H ~ B8F9FH。
2.2. 每页可显示25行,每行80字符。(共160字节)
2.3. 每个字符占2字节,低8位存ASCII,高8位存属性。
2.4. 每个字符可以有256 种属性(背景色、前景色、闪烁、高亮等组合信息)。
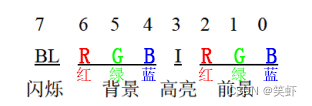
属性字节每一位的含义
分析
字符位置
简单计算一下居中的位置
行:25/2 - 3/2 = 11
列:80/2 - 'welcome to masm!'.length / 2 = 32
第11行32字符坐标:B867E ~ B867F'
/*** 计算字符在 80x25 字符模式下的位置* rows 	第几行* column	第几个字符* start 显示缓冲区起始位置,默认 0xB8000*/
function getOffset( _rows, _column, start=0xB8000){let rows= _rows - 1;let column = _column - 1;return (start + 160 * rows + column * 2).toString(16).toUpperCase();
}
getOffset(11, 32) // B867E
getOffset(11, 32, 0) // 67E
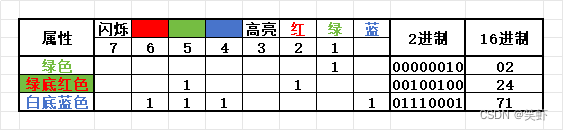
属性
解答
思路
遍历源字符串(数据段)复制到 目标内存中(显示缓冲区)。
- 先在数据段中定义
源字符串welcome to masm!。 - 遍历字符串,向
目标写入数据。字符串长度16固定,用立即数写入cx。 - 居中显示,我从第
11行第32字符开始B867E,初始偏移值67E用立即数写入bx备用。 - 第一二三
行偏移量用立即数表示分别为:0,160,320
第一行第一个字符:B867E + 0 字节
第二行第一个字符:B867E + 160字节
第三行第一个字符:B867E + 160字节 + 160字节 目标字符偏移量用di表示,初始为0,每轮循环结束前+2。(显示每个字符占2字节)- 先在
AX中装配好字符,再写入显示缓冲区对应的位置上。
6.1. 先将字符读到al
6.2. 再按所在行将属性写入ah。
6.3. 最后一起写入内存。
代码
assume cs:code, ds:data
data segmentdb 'welcome to masm!'	; 源字符串
data endscode segmentstart: mov ax,data		; 初始化数据段地址,读字符串mov es,axmov ax,0B800h	; 初始化显存段地址mov ds,ax		mov cx,16		; 字符串长度 16 就是循环处理次数mov si,0		; 源字符串偏移量mov bx,67Eh		; 目标字符串起始位置:第11行第32字符mov di,0		; 目标字符串偏移量s: 						; 循环遍历字符mov al,es:[si]			; 从源字符串读取字符mov ah,02h				; 第1行,高8位设置属性:绿色						mov [bx + di + 0  ], ax ; 写入字符 [起始位置 + 列偏移 + 行偏移]mov ah,24h				; 第2行,高8位设置属性:绿底红色mov [bx + di + 160],ax	; 写入字符 [起始位置 + 列偏移 + 行偏移]mov ah,71h				; 第3行,高8位设置属性:白底蓝色mov [bx + di + 320],ax	; 写入字符 [起始位置 + 列偏移 + 行偏移]inc si					; si += 1 指向源字符串中下一字符add di,2				; di += 2 指向目标字符串下一字符loop s					; 循环mov ax,4c00h			; 退出程序int 21h
code ends
end start
效果