家居行业网站建设网站开发php和ui
1.二叉排序树的定义
二叉排序树,又称二叉查找树(BST,Binary Search Tree)
默认不允许两个结点的关键字相同。
1.二叉排序树的性质:
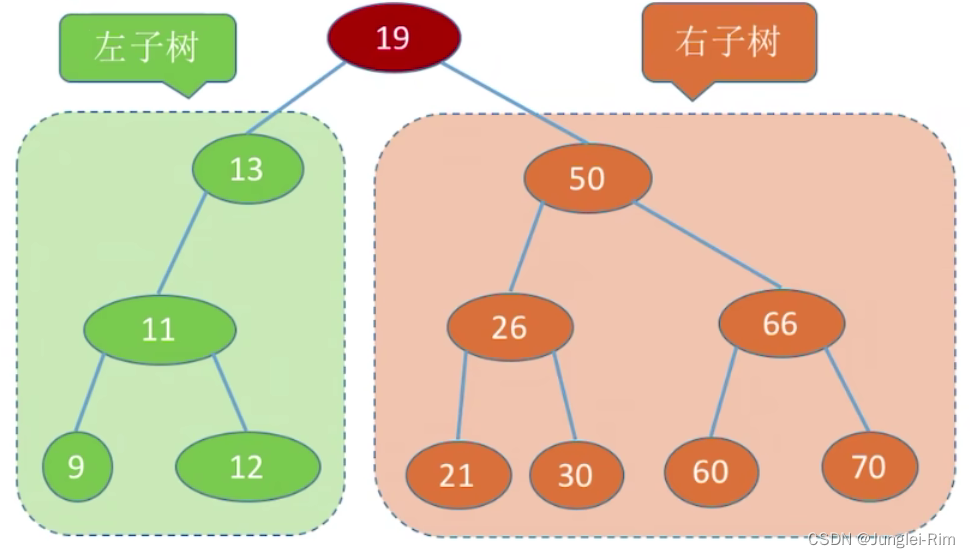
任意一棵二叉排序树的子树的结点大小都满足“左小右大”。
- 左子树上所有结点的关键字均小于根结点的关键字。
- 右子树上所有结点的关键字均大于根结点的关键字。
- 左子树和右子树又各是一棵二叉排序树。
例如下面这棵二叉排序树:
2.二叉排序树的特点:
- 左子树结点值<根结点值<右子树结点值。
- 进行中序遍历,可以得到一个递增的有序序列。
- 二叉排序树可用于元素的有序组织、搜索。
2.查找操作
从根节点开始,目标值更小往左找,目标值更大往右找。
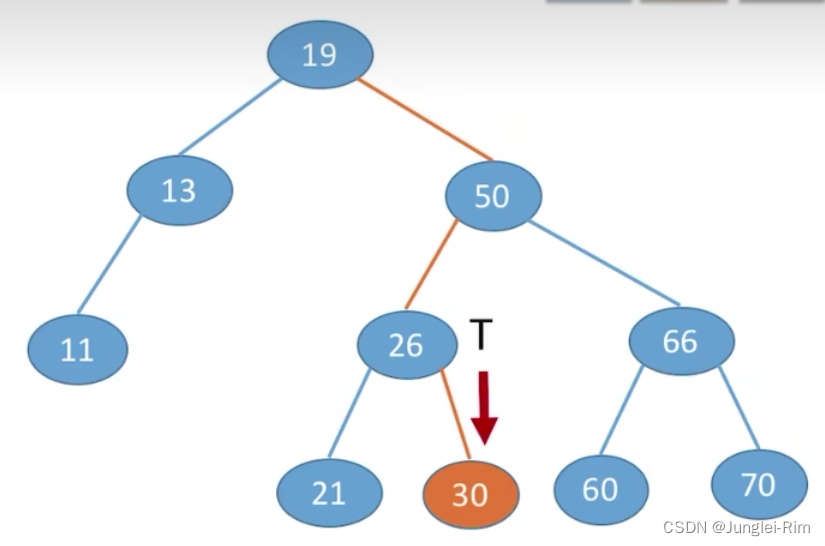
根据二叉排序树的特点:左子树结点值<根结点值<右子树结点值
1.查找步骤:
- 若树非空,目标值与根结点的值比较:
- 若相等,则查找成功;
- 若小于根结点,则在左子树上查找,否则在右子树上查找。
- 查找成功,返回结点指针;
- 查找失败返回NULL.
2.代码实现
1.二叉排序树结点设计:
//二叉排序树结点
typedef struct BSTNode {int key;struct BSTNode *lchild, *rchild;
} BSTNode, *BSTree;
2.查找函数设计:
非递归的实现:
最坏空间复杂度为O(1)
//在二叉排序树中查找值为key 的结点
BSTNode *BST_Search(BSTree T,int key){while(T!=NULL&&key !=T->key) {//若树空或等于根结点值,则结束循环if( key<T->key) T=T->lchild;//小于,则在左子树上查找else T=T->rchild;//大于,则在右子树上查找}return T;
}
递归实现:
最坏空间复杂度为O(h)
//在二叉排序树中查找值为key 的结点(递归实现)
BSTNode *BSTSearch(BSTree T, int key) {if (T == NULL)return NULL;//查找失败if (key == T->key)return T;//查找成功else if (key < T->key)return BSTSearch(T->lchild, key);//在左子树中找elsereturn BSTSearch(T->rchild, key);//在右子树中找
}
3.插入操作
找到应该插入的位置(一定是叶子结点),一定要注意修改其父节点指针。
1.实现步骤:
- 若原二叉排序树为空,则直接插入结点;
- 否则,若关键字k小于根结点值,则插入到左子树,
- 若关键字k大于根结点值,则插入到右子树
2.代码实现(递归插入)
最坏空间复杂度为O(h)
//在二叉排序树插入关键字为k的新结点(递归实现)
int BST_Insert(BSTree &T, int k) {if (T == NULL) {//原树为空,新插入的结点为根结点T = (BSTree) malloc(sizeof(BSTNode));T->key = k;T->lchild = T->rchild = NULL;return 1;//返回1,插入成功} else if (k == T->key)//树中存在相同关键字的结点,插入失败return 0;else if (k < T->key)//插入到T的左子树return BST_Insert(T->lchild, k);else//插入到T的右子树return BST_Insert(T->rchild, k);
}
3.通过插入操作构造一棵二叉排序树
//按照str[] 中的关键字序列建立二叉排序树
void Creat_BST(BSTree &T, int str[], int n) {T = NULL;//初始时T为空树int i = 0;while (i < n) {//依次将每个关键字插入到二叉排序树中BST_Insert(T, str[i]);i++;}
}
给定不同的关键字序列可能得到同款二叉排序树,也可能得到不同款二叉排序树。
4.删除操作
1.实现步骤:
-
先搜索找到目标结点
-
若被删除结点z是叶结点,则直接删除,不会破坏二叉排序树的性质。
-
若结点z只有一棵左子树或右子树,则让z的子树成为z父结点的子树,替代z的位置。
-
若结点z有左、右两棵子树,则令z的直接后继(或直接前驱)替代z,然后从二叉排序树中删去这个直接后继(或直接前驱),这样就转换成了第一或第二种情况。(采用的是中序遍历)
-
z的直接后继:z的右子树中最左下结点(该节点一定没有左子树)
-
z的直接前驱:z的左子树中最右下结点(该节点一定没有右子树)
5.查找效率分析
查找长度――在查找运算中,需要对比关键字的次数称为查找长度,反映了查找操作时间复杂度。
评估指标:
查找成功的平均查找长度ASL (Average Search Length)
1.查找成功的情况
- 若是树高为H,找到最小层的一个结点需要对比H次。
- 最好情况:n个结点的二叉树最小高度为 [ l o g 2 n ] + 1 [log_2n]+1 [log2n]+1
- 平均查找长度=O( l o g 2 n log_2n log2n)
- 最坏情况: 每个结点只有一个分支,树高h=结点数n,平均查找长度=O(n)。
2.查找失败的情况
需要补充失败结点的情况。