响应式企业展示型网站模板临沂营销网站建设
概述
- Webpack 场景下处理 JavaScript 的三种常用工具:Babel、TypeScript、ESLint 的历史背景、功能以及接入 Webpack 的步骤
- 借助这些工具,我们能构建出更健壮、优雅的 JavaScript 应用
使用 Babel
-
ECMAScript 6.0(简称 ES6) 版本补充了大量提升 JavaScript 开发效率的新特性,包括
class关键字、块级作用域、ES Module 方案、代理与反射等,使得 JavaScript 可以真正被用于编写复杂的大型应用程序,但知道现在浏览器、Node 等 JavaScript 引擎都或多或少存在兼容性问题 -
为此,现代 Web 开发流程中通常会引入 Babel 等转译工具。Babel 是一个开源 JavaScript 转编译器,它能将高版本 —— 如 ES6 代码等价转译为向后兼容,能直接在旧版 JavaScript 引擎运行的低版本代码,例如:
// 使用 Babel 转译前 arr.map(item => item + 1)// 转译后 arr.map(function (item){return item + 1; }) -
示例中高版本的箭头函数语法经过 Babel 处理后被转译为低版本
function语法,从而能在不支持箭头函数的 JavaScript 引擎中正确执行 -
借助 Babel 我们既可以始终使用最新版本 ECMAScript 语法编写 Web 应用,又能确保产物在各种环境下正常运行
-
提示:Babel 还提供了一个在线版的 REPL 页面,读者可在 babeljs.io/repl 实时体验功能效果
-
Webpack 场景下,只需使用
babel-loader即可接入 Babel 转译功能:
1 ) 安装依赖并配置
npm i -D @babel/core @babel/preset-env babel-loader
-
添加模块处理规则
module.exports = {/* ... */module: {rules: [{test: /\.js$/,use: ['babel-loader'],},],}, }; -
示例中,
module属性用于声明模块处理规则,module.rules子属性则用于定义针对什么类型的文件使用哪些 Loader 处理器,上例可解读为: -
test: /\.js$/:用于声明该规则的过滤条件,只有路径名命中该正则的文件才会应用这条规则,示例中的/\.js$/表示对所有.js后缀的文件生效 -
use:用于声明这条规则的 Loader 处理器序列,所有命中该规则的文件都会被传入 Loader 序列做转译处理
2 )执行编译命令
-
$
npx webpack -
接入后,可以使用
.babelrc文件或rule.options属性配置 Babel 功能逻辑,例如:// 预先安装 @babel/preset-env // npm i -D @babel/preset-env module.exports = {/* ... */module: {rules: [{test: /\.js$/,use: [{loader: 'babel-loader',options: {presets: ['@babel/preset-env'],},},],},],}, }; -
特别提一下,示例中的
@babel/preset-env是一种 Babel 预设规则集 —— Preset,这种设计能按需将一系列复杂、数量庞大的配置、插件、Polyfill 等打包成一个单一的资源包,从而简化 Babel 的应用、学习成本。 -
Preset 是 Babel 的主要应用方式之一,社区已经针对不同应用场景打包了各种 Preset 资源,例如:
-
babel-preset-react:包含 React 常用插件的规则集,支持preset-flow、syntax-jsx、transform-react-jsx等; -
@babel/preset-typescript:用于转译 TypeScript 代码的规则集 -
@babel/preset-flow:用于转译 Flow 代码的规则集 -
提示:关于 Babel 的功能、用法、原理还有非常大的学习空间,感兴趣的同学可以前往阅读官方文档:babeljs.io/docs/en/ ,这里点到为止,把注意力放回 Webpack + Babel 协作上
使用 TypeScript
- 从 1999年 ECMAScript 发布第二个版本到 2015年发布 ES6 之间十余年时间内,JavaScript 语言本身并没有发生太大变化,语言本身许多老旧特性、不合理设计、功能缺失已经很难满足日益复杂的 Web 应用场景
- 为了解决这一问题,社区陆续推出了一些 JavaScript 超集方言,例如 TypeScript、CoffeeScript、Flow
- 其中,TypeScript 借鉴 C# 语言,在 JavaScript 基础上提供了一系列类型约束特性,例如:

-
示例中,用一个数字类型的变量
num减去字符串类型的变量str,这在 TypeScript 的代码编译过程就能提前发现问题,而 JavaScript 环境下则需要到启动运行后才报错。 -
这种类型检查特性虽然一定程度上损失了语言本身的灵活性,但能够让问题在编译阶段提前暴露,确保运行阶段的类型安全性,特别适合用于构建多人协作的大型 JavaScript 项目,也因此,时至今日 TypeScript 依然是一项应用广泛的 JavaScript 超集语言。
-
Webpack 有很多种接入 TypeScript 的方法,包括
ts-loader、awesome-ts-loader、babel-loader。通常可使用ts-loader构建 TypeScript 代码:
1 )安装依赖并配置
- $
npm i -D typescript ts-loader - 配置 Webpack
const path = require('path'); module.exports = {module: {rules: [{test: /\.ts$/,use: 'ts-loader'},],},resolve: {extensions: ['.ts', '.js'],} }; - 使用
module.rules声明对所有符合/\.ts$/正则 —— 即.ts结尾的文件应用ts-loader加载器 - 使用
resolve.extensions声明自动解析.ts后缀文件,这意味着代码如import "./a.ts"可以忽略后缀声明,简化为import "./a"文件 - 创建
tsconfig.json配置文件,并补充 TypeScript 配置信息// tsconfig.json {"compilerOptions": {"noImplicitAny": true,"moduleResolution": "node"} } - 执行编译命令, $
npx webpack - 注意,如果项目中已经使用
babel-loader,你也可以选择使用@babel/preset-typescript规则集,借助babel-loader完成 JavaScript 与 TypeScript 的转码工作:
1 ) 安装依赖
- $
npm i -D @babel/preset-typescript - 配置 Webpack
// 预先安装 @babel/preset-env // npm i -D @babel/preset-env module.exports = {/* ... */module: {rules: [{test: /\.js$/,use: [{loader: 'babel-loader',options: {presets: ['@babel/preset-typescript'],},},],},],}, }; - 不过,
@babel/preset-typescript只是简单完成代码转换,并未做类似ts-loader的类型检查工作,大家需要根据实际场景选择适当工具
使用 ESLint
- JavaScript 被设计成一种高度灵活的动态、弱类型脚本语言,这使得语言本身的上手成本极低,开发者只需要经过短暂学习就可以开始构建简单应用。
- 但与其它编译语言相比,JavaScript 很难在编译过程发现语法、类型,或其它可能影响稳定性的错误,特别在多人协作的复杂项目下,语言本身的弱约束可能会开发效率与质量产生不小的影响,ESLint 的出现正是为了解决这一问题。
- ESLint 是一种扩展性极佳的 JavaScript 代码风格检查工具,它能够自动识别违反风格规则的代码并予以修复,例如对于下面的示例:
| 源码 | ESLint 修复后 |
|---|---|
const foo ='foo'; let bar='bar'; console.log(foo,bar) | const foo = 'foo' const bar = 'bar' console.log(foo, bar) |
ESLint 配置:module.exports = { "extends": "standard" } | |
ESLint 报错: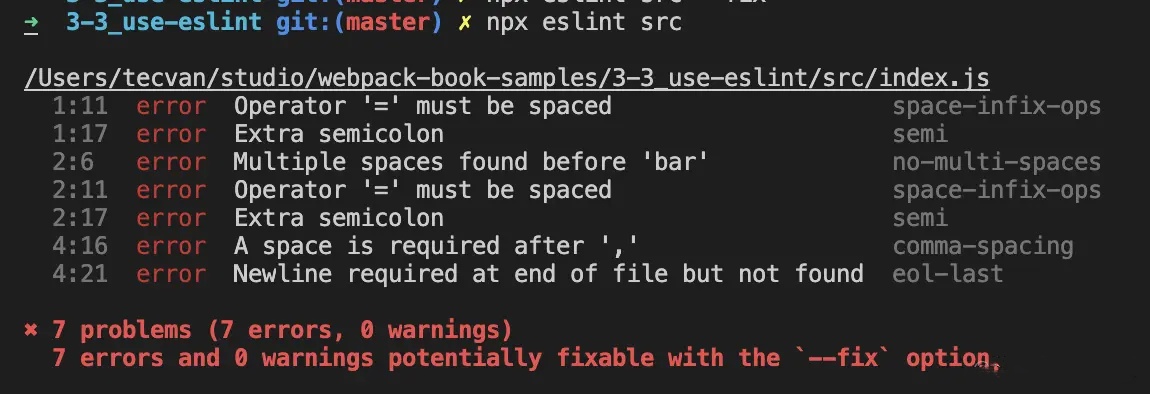 |
- 这里先忽略 ESLint 配置的具体规则,样例源码存在诸多风格不统一的地方,例如 1、2 行以
;结尾,而第 3 行没有;;第一行变量以const声明,第二行变量以let声明,等等。 - ESLint 会找出这些风格不一致的地方,并予以告警,甚至自动修复,生成如上表右上角的代码。
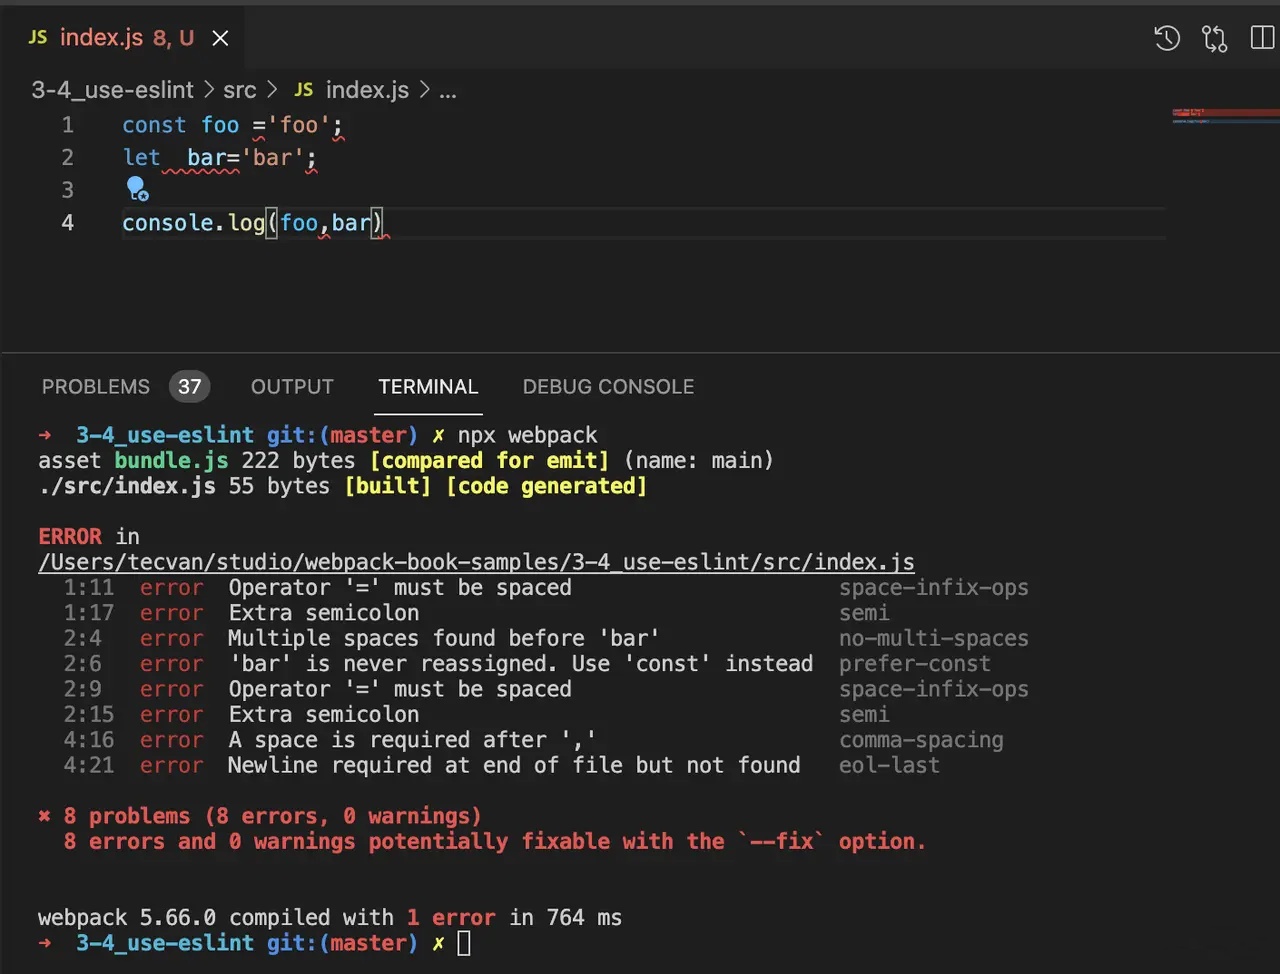
- Webpack 下,可以使用
eslint-webpack-plugin接入 ESLint 工具,步骤:
1 ) 安装依赖并配置
# 安装 webpack 依赖
yarn add -D webpack webpack-cli# 安装 eslint
yarn add -D eslint eslint-webpack-plugin# 简单起见,这里直接使用 standard 规范
yarn add -D eslint-config-standard eslint-plugin-promise eslint-plugin-import eslint-plugin-node
-
在项目根目录添加
.eslintrc配置文件,内容:// .eslintrc {"extends": "standard" } -
提示:关于 ESLint 配置项的更多信息,可参考:eslint.org/docs/user-g…
-
添加
webpack.config.js配置文件,补充eslint-webpack-plugin配置:// webpack.config.js const path = require('path') const ESLintPlugin = require('eslint-webpack-plugin')module.exports = {entry: './src/index',mode: 'development',devtool: false,output: {filename: '[name].js',path: path.resolve(__dirname, 'dist')},// 添加 eslint-webpack-plugin 插件实例plugins: [new ESLintPlugin()] }
2 ) 执行编译命令
- $
npx webpack - 配置完毕后,就可以在 Webpack 编译过程实时看到代码风格错误提示:
-
除常规 JavaScript 代码风格检查外,我们还可以使用适当的 ESLint 插件、配置集实现更丰富的检查、格式化功能,这里推荐几种使用率较高第三方扩展,建议读者跟进学习:
-
eslint-config-airbnb:Airbnb 提供的代码风格规则集,算得上 ESLint 生态第一个成名的规则集合 -
eslint-config-standard:Standard.js 代码风格规则集,史上最便捷的统一代码风格的方式 -
eslint-plugin-vue:实现对 Vue SFC 文件的代码风格检查 -
eslint-plugin-react:实现对 React 代码风格检查 -
@typescript-eslint/eslint-plugin:实现对 TypeScript 代码风格检查 -
eslint-plugin-sonarjs:基于Sonar的代码质量检查工具,提供圈复杂度、代码重复率等检测功能
综合示例
-
最后,我们再串联上述三种工具,构建一套功能完备的 JavaScript 应用开发环境,步骤:
-
安装基础依赖:
npm i -D webpack webpack-cli \# babel 依赖@babel/core @babel/cli @babel/preset-env babel-loader \# TypeScript 依赖typescript @typescript-eslint/parser @typescript-eslint/eslint-plugin \@babel/preset-typescript \# ESLint 依赖eslint eslint-webpack-plugin -
创建
webpack.config.js配置文件并输入:const path = require('path') const ESLintPlugin = require('eslint-webpack-plugin')module.exports = {entry: './src/index.ts',mode: 'development',devtool: false,output: {filename: '[name].js',path: path.resolve(__dirname, 'dist')},module: {rules: [{test: /\.ts$/,use: {loader: 'babel-loader',options: { presets: ['@babel/preset-typescript'] }}}]},plugins: [new ESLintPlugin({ extensions: ['.js', '.ts'] })] } -
注意,此处使用
@babel/preset-typescript插件转译 TypeScript 代码。 -
创建
.eslintrc文件并输入:{"parser": "@typescript-eslint/parser","plugins": ["@typescript-eslint"],"extends": ["plugin:@typescript-eslint/recommended"] } -
之后只需执行
npx webpack命令即可完成编译操作,例如:
src/index.ts 源码 | 编译结果 |
|---|---|
const say = (statements: string) => { console.log(statements) }; // @ts-ignore say("Tecvan"); | /******/ (() => { // webpackBootstrap var __webpack_exports__ = {}; /*!**********************!*\ !*** ./src/index.ts ***! \**********************/ const say = statements => { console.log(statements); }; // @ts-ignore say("Tecvan"); /******/ })() ; |
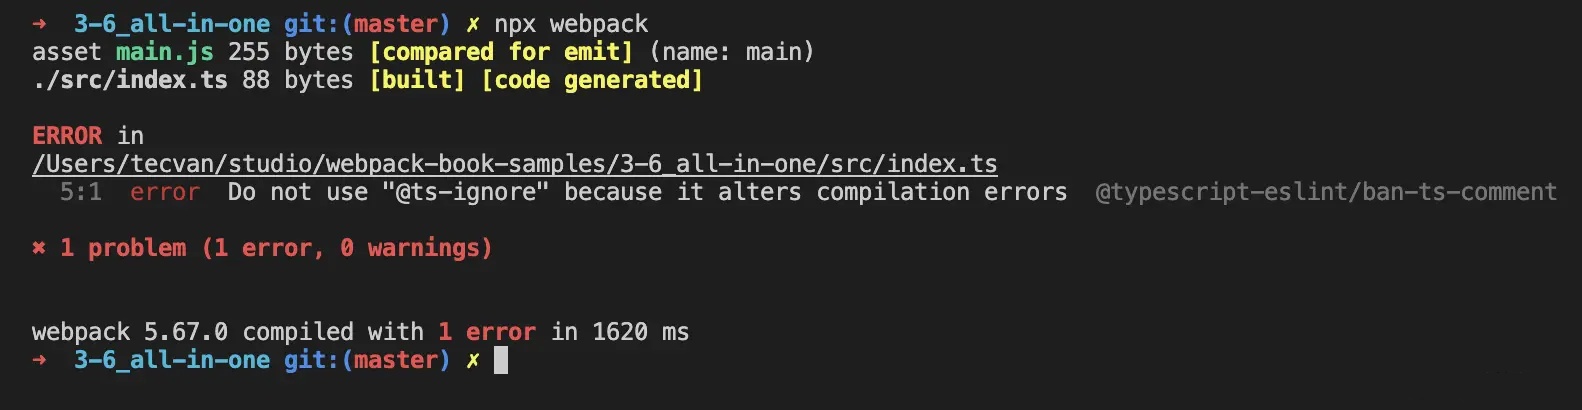 |
- 至此,我们就搭建了一个支持 Babel + TypeScript + ESLint 的开发环境,读者可在此基础上修改各项工具配置,定制适合自己项目的开发环境。
总结
- 本文介绍了 ESLint、TypeScript、Babel 三类工程化工具的历史背景、功能,以及在 Webpack 中接入这些工具的具体步骤。
- 这三种工具各自补齐了 JavaScript 语言某些薄弱环节:
- Babel 提供的语言转译能力,能在确保产物兼容性的同时,让我们大胆使用各种新的 ECMAScript 语言特性;
- TypeScript 提供的类型检查能力,能有效提升应用代码的健壮性;
- ESLint 提供的风格检查能力,能确保多人协作时的代码一致性
- 它们已成为构建现代 JavaScript 应用的基础设施