建设银行指定网站wordpress主题开发导航制作
引言:
你需要的I2C知识这里都有, 本文涵盖了I2C的基本知识和在各个主流平台的开发实例, 总之, 你需要的,都在这里, 后续我也会继续更新在嵌入式开发中常见的通信协议。
一、I2C的基本知识
1. I2C介绍
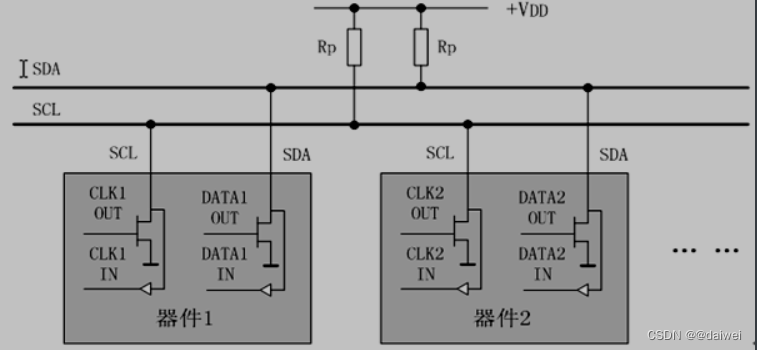
IIC总线是Philips公司在八十年代初推出的一种串行、半双工总线,主要用于近距离、低速的芯片之间的通信;IIC总线有两根双向的信号线,一根数据线SDA用于收发数据,一根时钟线SCL用于通信双方时钟的同步;IIC总线硬件结构简单,成本较低,因此在各个领域得到了广泛的应用
2 I2C的几种常见通信时序
主机向从机发送数据

从机向主机发送数据

主机先向从机发送数据,然后从机再向主机发送数据

IIC总线是一种多主机总线,连接在IIC总线上的器件分为主机和从机 主机有权发起和结束一次通信,而从机只能被主机呼叫;当总线上有多个主机同时启用总线时,IIC也具备冲突检测和仲裁的功能来防止错误产生;
每个连接到IIC总线上的器件都有一个唯一的地址(7bit),且每个器件都可以作为主机也可以作为从机(同一时刻只能有一个主机),总线上的器件增加和删除不影响其他器件正常工作;IIC总线在通信时总线上发送数据的器件为发送器,接收数据的器件为接收器;
二、软件模拟I2C
#ifndef __MYI2C_H
#define __MYI2C_Hvoid MyI2C_Init(void);
void MyI2C_Start(void);
void MyI2C_Stop(void);
void MyI2C_SendByte(uint8_t Byte);
uint8_t MyI2C_ReceiveByte(void);
void MyI2C_SendAck(uint8_t AckBit);
uint8_t MyI2C_ReceiveAck(void);#endif
#include "stm32f10x.h"                  // Device header
#include "Delay.h"void MyI2C_W_SCL(uint8_t BitValue)
{GPIO_WriteBit(GPIOB, GPIO_Pin_10, (BitAction)BitValue);Delay_us(10);
}void MyI2C_W_SDA(uint8_t BitValue)
{GPIO_WriteBit(GPIOB, GPIO_Pin_11, (BitAction)BitValue);Delay_us(10);
}uint8_t MyI2C_R_SDA(void)
{uint8_t BitValue;BitValue = GPIO_ReadInputDataBit(GPIOB, GPIO_Pin_11);Delay_us(10);return BitValue;
}void MyI2C_Init(void)
{RCC_APB2PeriphClockCmd(RCC_APB2Periph_GPIOB, ENABLE);GPIO_InitTypeDef GPIO_InitStructure;GPIO_InitStructure.GPIO_Mode = GPIO_Mode_Out_OD;         //开漏输出,,因为I2C总线默认是电阻弱上拉GPIO_InitStructure.GPIO_Pin = GPIO_Pin_10 | GPIO_Pin_11;GPIO_InitStructure.GPIO_Speed = GPIO_Speed_50MHz;GPIO_Init(GPIOB, &GPIO_InitStructure);GPIO_SetBits(GPIOB, GPIO_Pin_10 | GPIO_Pin_11);      //将模拟的两个引脚设置为默认高电平
}//起始条件:在SCL为高电平的时候, 数据线由高变低
void MyI2C_Start(void)
{MyI2C_W_SDA(1);MyI2C_W_SCL(1);MyI2C_W_SDA(0);MyI2C_W_SCL(0);
}//结束条件:在scl的高电平期间, SDA由低变高
void MyI2C_Stop(void)
{MyI2C_W_SDA(0);MyI2C_W_SCL(1);MyI2C_W_SDA(1);
}void MyI2C_SendByte(uint8_t Byte)
{uint8_t i;for (i = 0; i < 8; i ++){MyI2C_W_SDA(Byte & (0x80 >> i));   //高位先行MyI2C_W_SCL(1);MyI2C_W_SCL(0);         //scl为低电平的时候往数据线上准备数据}
}uint8_t MyI2C_ReceiveByte(void)
{uint8_t i, Byte = 0x00;MyI2C_W_SDA(1);for (i = 0; i < 8; i ++){MyI2C_W_SCL(1);         //时钟线为高的时候读取数据,这个期间需要保持稳定if (MyI2C_R_SDA() == 1){            //对应的哪一位为1, 就将其置1Byte |= (0x80 >> i);}MyI2C_W_SCL(0);}return Byte;
}//确认信号,在SCL的高电平期间, 将sda拉低
void MyI2C_SendAck(uint8_t AckBit)
{MyI2C_W_SDA(AckBit);MyI2C_W_SCL(1);MyI2C_W_SCL(0);
}uint8_t MyI2C_ReceiveAck(void)
{uint8_t AckBit;MyI2C_W_SDA(1);MyI2C_W_SCL(1);AckBit = MyI2C_R_SDA();MyI2C_W_SCL(0);return AckBit;
}
以上便是软件模拟i2c的全部代码,说一下本质, 以及软件模拟i2c时序的优点, 本质就是控制GPIO引脚输出高低电平来模拟I2C通信的时序。
软件模拟I2C的优点: 因为在咱们的SOC内部虽然集成了I2C硬件控制器, 但是数量有限, 使用软件I2C就可以将具有GPIO功能的引脚改造成为i2c协议, 这也就是为什么这个协议如此强大和受欢迎。
这些代码, 我认为能看懂实在干嘛就行, 真正用的时候再来我这里复制过去, 改一下引脚, 哎呀, 忘记把引脚,时钟,封装成宏了, 算了, 大家在使用的时候全部替换一下, 替换成那么的引脚, 大家将这些经常发生变动的地方封装一下, 这样会很方便。