找南昌网站开发公司肇庆 网站建设公司有哪些
摘 要
随着学习压力越来越大,课外参加补习班的学生越来越多。现在大多数学生采用请家教、自学、报名补习班的方式进行课外的额外学习。请家教费用昂贵,自学效率低,碰到自己不会的知识不能及时得到解达,报名补习班需要时间、地点的配合,灵活性低,而且现在国家不提倡校外的补习班。目前,网络发展成熟,各类网站平台层出不穷,如果可以有专业的网站提供网上辅助学习,则可以帮助学生的课外学习。
本基于VUE.js的在线教育系统采用B/S框架进行设计,语言采用Java,数据库为Mysql。在技术中加入VUE.js,使界面更加丰富、友好。本系统针对课程购买而开发,使用角色为管理员和学生、教师。学生可以通过注册登录,在界面里浏览课程视频进行学习,可以收藏课程和发表留言并购买课程,实现订单管理。管理员可以管理学生信息、课程信息、发布班级和管理章节等。教师可以管理课程订单和课程以及管理章节等。在本系统中,学生可以利用自己的空闲时间自主学习,灵活性强,针对不懂的课程也可以多次学习和在线提问,对学生的学习帮助非常大。
关键词: 购买课程;课程信息管理;发表留言;Java语言
Abstract
With the increasing pressure of study, more and more students participate in remedial classes after class. At present, most students use tutors, self-study and sign up for remedial classes for extra-curricular learning. The cost of tutoring is expensive and the efficiency of self-study is low. When you encounter knowledge you can’t understand in time, signing up for remedial classes requires the cooperation of time and place, and the flexibility is low. Moreover, the state does not advocate out of school remedial classes. At present, the network is mature, and various website platforms emerge in endlessly. If professional websites can provide online assisted learning, it can help students’ extracurricular learning.
This is based on Vue JS online education system is designed with B / S framework, Java language and MySQL database. Add Vue to the technology JS to make the interface more rich and friendly. The system is developed for course purchase, and the roles are administrator, students and teachers. Students can register and log in, browse course videos in the interface for learning, collect courses, post messages and buy courses to realize order management. Administrators can manage student information, course information, publish classes and manage chapters. Course and order management. In this system, students can use their free time to study independently with strong flexibility. For courses they don’t understand, they can also study and ask online questions for many times, which is very helpful to students’ learning.
Key words: purchasing courses; Curriculum information management; Post a message; Java language
目 录
摘 要 1
Abstract 2
第1章 绪论 5
1.1课题研究背景和来源 5
1.2课题研究现状 5
1.3课题开发的目的和意义 6
1.4课题开发内容 6
1.5论文结构安排 7
第2章 系统开发关键技术介绍 8
2.1系统开发使用的关键技术 8
2.2 VUE.js技术介绍 8
2.3 Idea介绍 8
2.4 Mysql数据库介绍 9
2.5 B/S结构介绍 9
第3章 系统分析 10
3.1系统需求分析 10
3.2系统可行性分析 10
3.2.1技术可行性 10
3.2.2经济可行性 11
3.2.3运行可行性分析 11
3.2.4法律可行性 11
3.3系统功能分析 11
3.4系统性能分析 13
3.5业务流程分析 13
第4章 系统设计 15
4.1系统功能结构设计 15
4.2系统数据库设计 15
4.2.1数据库ER图设计 16
4.2.2数据库表设计 18
第5章 系统实现 24
5.1前台界面的实现 24
5.1.1首页界面的实现 24
5.1.2课程信息功能的实现界面 24
5.1.3个人中心功能的实现界面 25
5.1.4课程购买功能的实现界面 26
5.1.5课程视频功能的实现界面 26
5.1.6在线留言功能的实现界面 27
5.1.7章节信息功能的实现界面 27
5.1.8课程订单管理功能的实现界面 28
5.2管理员功能的实现界面 28
5.3教师功能的实现界面 29
第6章 系统测试 31
6.1系统测试的目的 31
6.2系统测试的重要性和方法 31
6.3系统的测试步骤 31
6.4系统的测试用例 32
6.5测试总结 33
总 结 34
致 谢 35
参考文献 36
第1章 绪论
1.1课题研究背景和来源
目前的网站平台类系统已各种各样,涉及到生活中的每一个部分。购物类、管理类、信息统计类、办公类、官网类等非常丰富。我国各类网站的发展已非常成熟,这些系统依靠网络和计算机技术不断完善发展为人们带来更好的生活体验。而学习类的网站更是多种多样,像比如出名的慕课网、各种辅导网等拥有的客户群体都非常大。
受我国教育理念的影响,每个家庭都非常注重学生的学习,为学生提供最好的教育辅助。我国人口众多,竞争压力也越来越大,随着国民经济水平的提升,越来越多的家庭都认识到教育的重要性。我国的教育水平还处在基础阶段,学生获得知识的主要途径是通过老师在学校里传授,这种方式由于学生接受能力不同而造成学生的学习效果不同。接受能力差的同学家里会想要通过其它方式进行实习,现在流行的网上教学非常受家长欢迎。但网上教学费用昂贵,对家庭条件一般的学生来说压力非常大。
1.2课题研究现状
目前学生获得知识的主要途径还是通过传统方式。采用在学校由老师在教室上课的方式,这种方式对于接受能力强的同学来说非常适合,但对学习能力差的同学来说非常困难,特别是一些自我约束能力小的同学来说,做到专心上课听讲都非常难。这部分学生想要提高成绩必要采用其它辅助手段,像参加课外补习班、请家教、找同学帮助、在线学习等方式都可以提高学生的学习成绩。但现在国家政策不允许开设课外补习班,大量的学生转换到线上辅导学习。
我国线上学习的发展已形成一定的规模,在众多教学网站里商业性质强。而且采用的都是老师授课,学生自己理解,理解不了的知识再进行提问解答。学生自学部分相对较少,主要由老师引导学习,不能培养学生的自学能力。学生自学能力不能发辉,提高不了学生的学习积极性,对提高学生成绩效果也就大打折扣。
1.3课题开发的目的和意义
本系统的实现目的在于帮助学生的学习。和网上的商用教学网站相比,本系统针对性更强,向使用用户展示最为详细的课程信息,并可以以多种方式展示,以此来调动学生的学习积极性。本系统中的课程学生可以购买,对于不明白的地方也可以在线提问。本系统的核心在于内容,以丰富的课程种类取胜,去繁留简,使本系统的用户更容易抓住重点,找到核心内容,减少用户烦躁心理。本系统的实现拥有更大的意义:
(1)本系统功能简单、针对性强,使系统用户更为直观,操作也更为简单,只要有上网经验的用户都可以轻松掌握;
(2)本系统采用多种课程种类,用户可以根据自己的喜好选择更适合自己的方式进行学习;
(3)本系统中的课程信息都是由教师发布、管理员审核,可以做到正确、精准;
(4)本系统中设有留言功能,用户相互之间可以形成交流讨论,可以打开新的学习思路和解决学习疑问。
1.4课题开发内容
本基于VUE.js的在线教育系统采用前台+后台的方式进行设计。前台信息主要为内容展示,后台信息为用户可以操作的功能。本系统的前台信息可由非注册用户、注册用户、管理员共同浏览,主要信息为课程信息。课程详情里添加视频,使课程更加立体,方便学生更好的理解。注册用户在前台可以浏览课程信息并可以收藏课程,也可以发布自己的留言进行分享讨论,对需要的课程要以购买。注册用户在个人后台可以管理自己发布的留言和收藏的课程以及购买的课程。管理员在后台的功能为课程类别管理、章节管理、基础数据管理和课程管理、用户管理以及前台图片的设置。教师可以发布课程和回复学生的留言、管理课程订单以及课程的章节等。
1.5论文结构安排
本篇论文分为摘要、目录、绪论、系统开发关键技术介绍、系统分析、系统设计和系统实现、系统测试、总结、致谢、参考文献。本篇论文的核心集中在系统设计和系统实现部分。绪论部分为基础调研,在系统分析中阐述系统的需求分析、可行性分析和数据流程图、用例图等。
第2章 系统开发关键技术介绍
2.1系统开发使用的关键技术
本系统在开发中选择B/S框架进行设计,语言采用Java,数据库采用Mysql,并在设计中加入VUE.js技术,本系统的运行环境为Idea。
2.2 VUE.js技术介绍
VUE.js是一个用来开发前台界面的JavaScript框架,体积非常的小,所以运行效率非常的高,可以直接通过虚拟设定的 DOM进行各种JavaScript计算,因为操作过程中相当于是一个预处理,所以并没有真实的DOM,也可以称作为一个虚拟的DOM。VUE.js还可以进行双向的数据绑定,这样操作起来更加的简单,使用户可以不用管DOM对象,直接去操作业务逻辑就可以了,可以应用的场景非常的多,而且开发成本也非常的低。目前的市场后已经有很多成熟稳定的框架组件,可以直接拿来使用,对于初学者来说非常的方便。
2.3 Idea介绍
Idea是公认的最好用Java开发工具之一,常见最多的都是用来跟Eclipse进行比较,Eclipse可以说是最简单的,但是在兼容方面,代码设计方面明显不足。而Idea就是在Eclipse基础上进行了整合升级,更加智能。Idea最大的创新就是有智能代码助手,可以实现代码提示,还能进行代码重构,代码审查,非常适合新手的使用。Idea的宗旨就是实现智能编码,使编码更加的简单,所以在Idea上有很多其他软件所没有的特色功能,比如进行智能选取,不需要开发者在手动操作,还有各种丰富的导航模式可供选择,可以直接导入就能使用,不需要开发者在重新建立,还有历史记录功能,在误删误操作的情况下,通过这个功能就可以直接恢复。而且Idea相比Eclipse调试也更简单,通过Eclipse调试的时候需要选定表达式,否则就没办法查看它的值,而通过Idea则不需要进行任何操作,Idea会自动理解你所需要的表达式,然后给你建议参考值。而且在编码方面更加智能,会自动跳出需要的变量和参数,然后建议你最优选择。所以说相比Eclipse来说,用Idea开发更加的简单方便,更适合新用户的开发使用。
2.4 Mysql数据库介绍
数据库主要就是用来存储和管理系统数据的,按照数据结构来进行组织和存储的,数据库都有自己独立的接口来进行创建,访问,管理等,也可以直接用文件的形式进行数据存储,但是读写速度比较慢,效率不高,所以一般都是采用专门的数据库软件来进行数据库存储和管理,这样可以更加科学有效的实现数据的存储,也更加的安全。而mysql就是一个关系型数据库管理系统,可以把各种不同的数据库存储到不同的表结构中 ,这样可以提高查找效率。
2.5 B/S结构介绍
B/S模式最大的特点就是可以直接通过网络进行系统的访问,对于用户端来说只需要一个浏览器就可以,通过B/S模式开发的系统可以用户提供实时的在线服务,当后台数据进行更新,前台会实时进行更新,保障了数据同步,效率非常的高,非常适合电子商务网站的开发。B/S架构是从C/S架构上发展来的,传统的C/S架构是采用的客户端的形式,由于以前的互联网没有现在这么发达,所以大多的办公软件都是在局域网内使用的,可以不需要互联网就能运行,前提是计算机硬件有一定的要求,必须电脑上安装上客户端软件,才能使用,而且后期的维护也比较麻烦,需要每个设备都进行维护。而B/S架构是直接把数据信息都存储到了服务器里,然后用户端不需要安装任何的编程软件,只需要浏览器就可以直接进行访问,而且维护非常的简单方便,对用户没有任何的影响,而且交互性更好,所以更适合电子商务网站的开发和使用。
第3章 系统分析
3.1系统需求分析
目前学生想要提高自己的成绩大多采用额外自学,自己自学的效率非常低,并且效果也并不明显,对于条件好的家庭会选择请家教或者上专业的远程课。但这些都不能充分调动学生的自主学习积极性,被动性强的结果就是学习效果不好,想要真正的提高学生的成绩最根本需要学生提高自主学习能力。而本基于VUE.js的在线教育系统提供课程详情,由学生自己学习,并通过多种方式调动学生的学习积极性。比如添加留言功能、课程视频功能,学生可以通过彼此之间的交流和讨论提高学习兴趣从而提高学习成绩,本基于VUE.js的在线教育系统前景非常好。
3.2系统可行性分析
可行性分析主要是先进行初步调查,然后从各个方面进行系统可行性研究,比如系统需要做什么,采用什么技术,进行各种分析研究,然后得到一个可行性的方案。然后在对方案进行各个功能模块的设计,进行系统设计分析,研究系统设计可行性。所以要从多方面进行考虑,而本文主要从技术上,经济上,操作上,法律上进行研究分析。
3.2.1技术可行性
随着技术的快速发展,各种软件开发技术也在不停的更新,不断的发展,大家都在选择适合自己水平的,能达到开发需求的软件技术和开发环境。所以根据我的开发需求,然后决定开发本系统采用Java语言B/S框架来完成,开发出来的系统可以满足功能需求,而且操作界面美观,符合目前的审美,最重要的是开发相对简单,可以自动生成所需要的框架结构。前端框架采用VUE.js,数据库Mysql,体积更小,存储速度快,可以满足本次开发的需求。
3.2.2经济可行性
经济可行性分析主要是对前期投资进行分析,对系统维护费用分析,对开发完成后取得的经济收益进行分析。因为本系统完全是自己开发的,作为毕业设计用途的,只需要基础的设施就行,需要电脑硬件,开发软件等,不需要额外的投入,完全满足开发需求。而系统开发完成后可以方便用户使用,还能带来一定的经济效益,所以开发本系统在经济上是可行的。
3.2.3运行可行性分析
开发本系统过程中已经充分考虑了使用者的感受,界面美观,而且有功能导航栏,方便用户很好的掌握,而且还有各种提示符,哪怕对计算机操作不熟练的也能使用本系统。所以综合考虑,本系统在运行方面是可行的。
3.2.4法律可行性
开发本系统过程中参阅的相关资料都是在学校图书馆参阅的,均为正规渠道,而且开发均是本人独立开发的,均是自己的知识储备,全是自己原创的,不存在知识产权,所以才法律上是可行的。
3.3系统功能分析
本系统采用功能针对性强、文字描述精确的方式进行设计。本基于VUE.js的在线教育系统是关于在线学习的系统,在设计功能时只取用最基础的功能,目的是提供最精准的服务。本系统包括前台和后台两部分。
前台的功能主要为课程信息管理。学生可以浏览课程信息、课程的文章信息、课程的评价信息,可以发表留言以及收藏课程、购买课程。学生在个人中心里可以管理收藏信息、留言信息、订单信息。教师负责发布课程、管理章节、管理课程订单等。管理员负责课程类型、课程信息、课程订单、章节信息、学生信息、教师信息等的管理。
管理员用例图如下图3.1所示:

图3.1管理员用例图
学生用例图如下图3.2所示:

图3.2学生用例图
教师用例科如下图3.3所示:

图3.3教师用例图
3.4系统性能分析
系统性能方面包括系统的框架、系统的开发理念、系统的开发界面原则、系统开发标准、系统开发流程、系统开发安全性、系统运行稳定性等。具体性能分析如下:
(1)本系统是面向所有人群而开发的网站平台,所以采用的框架模式为B/s,B/s模式是借助浏览器进行系统访问的平台,所有信息可以共享;
(2)系统在设计中采用结构化方式,首先将功能分为大的方面,再由大方面分为小方面,最后分为小细节再整合成完整的系统;
(3)系统在界面设计时采用VUE.js技术,可以使界面更丰富,元素更多;
(4)系统的操作流程采用简单的思路,使使用用户可以快速掌握本系统;
(5)系统的运行速度要快,所有操作可以快速反映;
(6)在系统开发时要注意系统的资源占用,以最少占用为标准进行设计;
(7)采用发展的眼光看待问题,把系统的生命周期延长到最大;
(8)调查所有使用用户的需求尽可能的满足。
3.5业务流程分析
业务流程涉及到系统的每个部分,调查系统在运行中数据会流动的每个环节,以学生注册开始到学生课程学习、购买进行业务流程分析。确保所有信息的流入、流出以及数据的完整性和处理问题的方法。本系统的流程为学生首先通过注册,注册成功后进行登录,登录后可以浏览简章节信息、课程信息,在课程详情里可以收藏课程和播放课程视频以及给课程留言、购买课程,还可以发布留言和管理订单信息、收藏信息、留言信息等。教师负责添加课程信息和视频信息、管理章节信息和学生信息等。系统中的所有数据都需要管理员审核。本系统的业务流程图如下图3.4所示:

图3.4系统业务流程图
第4章 系统设计
4.1系统功能结构设计
本系统的功能界面设计为四个,前台界面、学生中心界面和管理员中心界面、教师中心界面。根据不同用户的不同需求分开设计功能。前台界面的功能为课程信息、首页、个人中心、后台管理等,学生中心界面的功能为个人资料、我的收藏管理、课程订单管理等,管理员中心界面的功能为学生信息、课程信息管理等,教师中心界面的功能为课程、章节管理等。本系统的功能结构图如下图4.1所示:
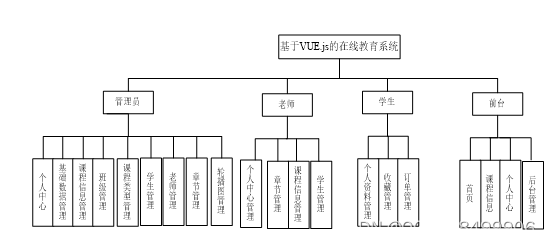
图4.1系统功能结构图
4.2系统数据库设计
数据库就是数据的存储仓库,按照计算机的格式进行数据存入。为了使数据库具有独立性,防止因为系统崩溃而数据有损的问题在数据库建立时都采用单独的数据库。数据库具有共享性和单独性,在系统运行时会自动和相对应的数据进行通讯连接。本基于VUE.js的在线教育系统采用Mysql数据库设计,身份验证为Root,密码为Root。
4.2.1数据库ER图设计
根据分析所得本系统中主要的数据为管理员、学生、课程信息、课程视频、订单信息、留言信息等。所以本节针对这些数据画出数据ER图。
(1)管理员实体的属性为用户名和密码。管理员实体ER图如下图4.2所示:
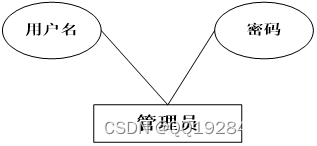
图4.2管理员实体ER图
(2)学生实体的属性为编号、姓名、班级、专业等。学生实体ER图如下图4.3所示:

图4.3学生实体ER图
(3)留言信息实体的属性包括留言人、留言时间、内容等。留言信息实体ER图如下图4.4所示:

图4.4留言信息实体ER图
(4)订单实体的属性包括编号、购买课程、订单时间、价格等。订单实体的ER图如下图4.5所示:

图4.5订单实体ER图
(5)类别信息实体的属性包括编号和名称。类别信息实体ER图如下图4.6所示:

图4.6分类信息实体的ER图
(6)本系统的关系ER图如下图4.7所示:
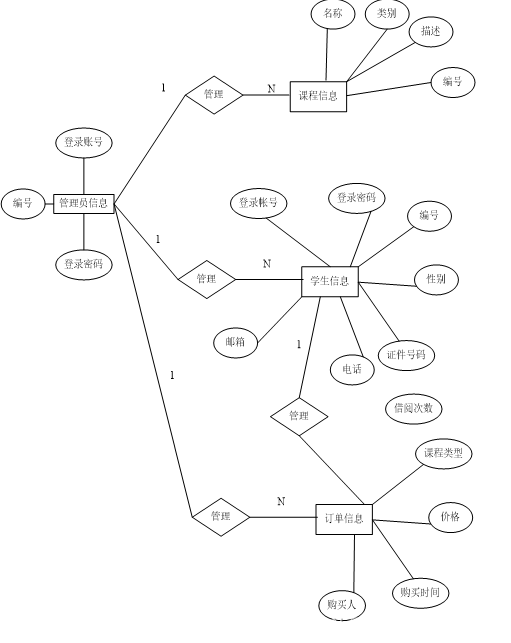
图4.7系统关系ER图
4.2.2数据库表设计
本系统针对课程在线学习而设计,所以本系统的数据库表围绕课程而建立。本系统的数据库表包括课程信息表、留言信息表、订单信息表等。本系统的数据库表结构如下图4.1-4.13 所示:
表4.1 config
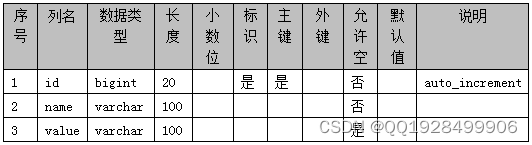
表4.2 dictionary
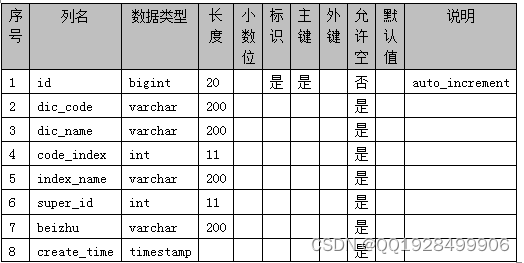
表4.3 kecheng
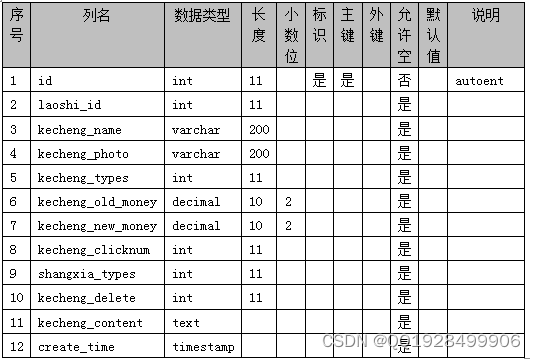
表4.4 kecheng_collection

表4.5 kecheng_liuyan
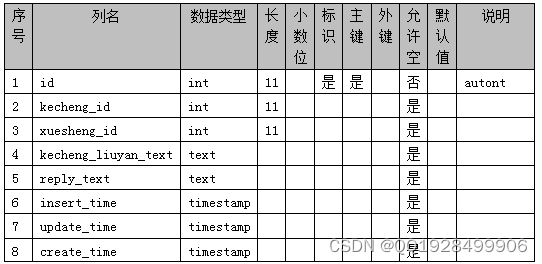
表4.6 kecheng_order
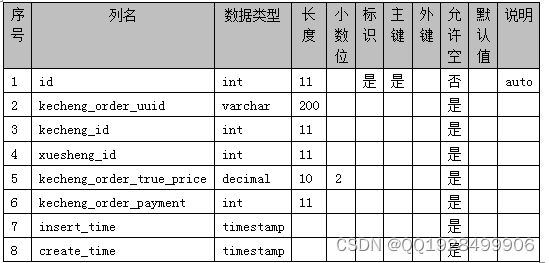
表4.7 laoshi
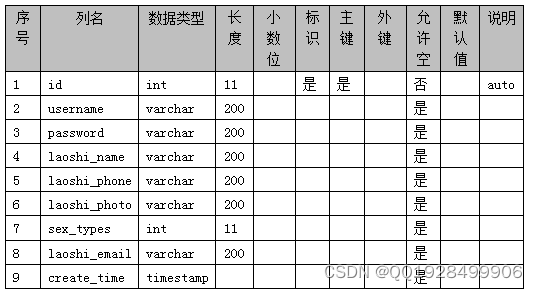
表4.8 token
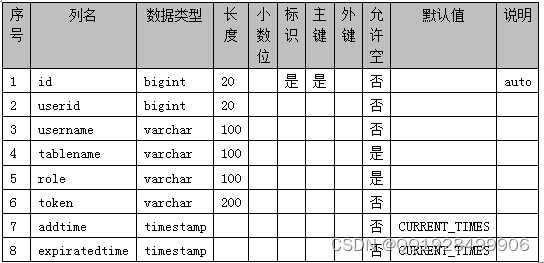
表4.9 users

表4.10 xuesheng
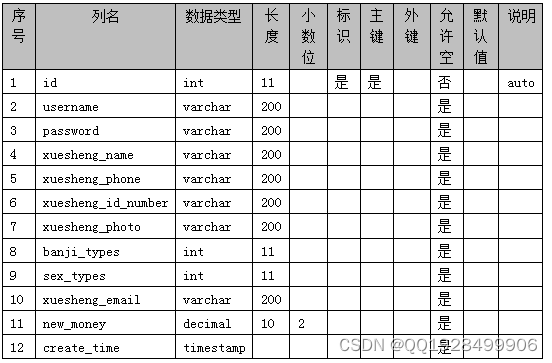
表4.11 zhangjie

表4.12 zhangjie_collection

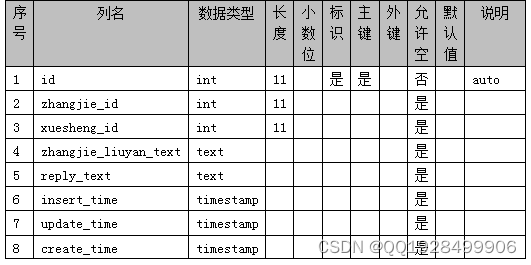
表4.13 zhangjie_liuyan
第5章 系统实现
5.1前台界面的实现
在前台里所有的信息都是共享的,注册用户、非注册用户、游客都可以浏览。主要为课程信息、个人中心和后台管理。
5.1.1首页界面的实现
本功能设计的目的是帮助用户一键返回首页,在首页里的元素包括轮播图、列表框、文字、图片等。在首页的上半部分是绿底白字的系统名称,系统名称下面是导航栏,接着就是轮播图,轮播图下面是课程信息。首页界面的实现界面如下图5.1所示:

图5.1首页界面的实现效果
5.1.2课程信息功能的实现界面
在课程信息界面里可以看到所有的课程。课程信息以课程的封面来展示,学生可以一目了然。课程信息功能的实现界面如下图5.2所示:
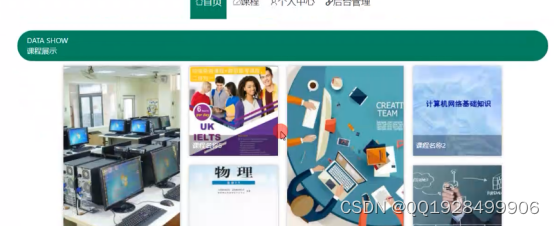
图5.2课程信息功能的实现界面
课程详情的实现界面如下图5.3所示:

图5.3课程详情的实现界面
5.1.3个人中心功能的实现界面
用户登录后在个人中心里可以管理自己的注册信息和收藏信息、订单信息,实现界面如下图5.4所示:

图5.4用户中心的功能实现界面
5.1.4课程购买功能的实现界面
在本功能模块里展示购买的课程名称、点击次数以及订单号。课程购买信息功能的实现界面如下图5.5所示:
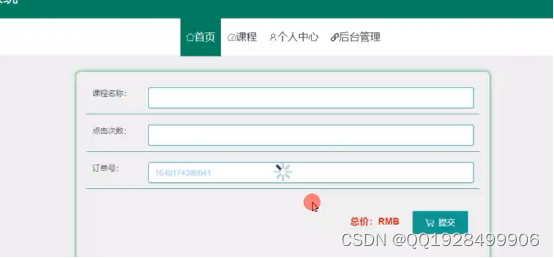
图5.5课程购买信息功能的实现界面
5.1.5课程视频功能的实现界面
课程视频功能里可以看到课程的图片和标题,点击课程图片可以进入课程详情里,在课程详情里用户可以留言和收藏课程以及播放课程视频。课程视频功能的实现界面如下图5.6所示:

图5.6课程视频功能的实现界面
5.1.6在线留言功能的实现界面
用户在添加留言时可以只填写留言内容,留言成功后会显示留言人的账号和头像。用户在线留言功能的实现界面如下图5.7所示:

图5.7用户在线留言功能的实现界面
5.1.7章节信息功能的实现界面
学生在课程详情里可以浏览该课程的章节。章节信息功能的实现界面如下图5.8所示:
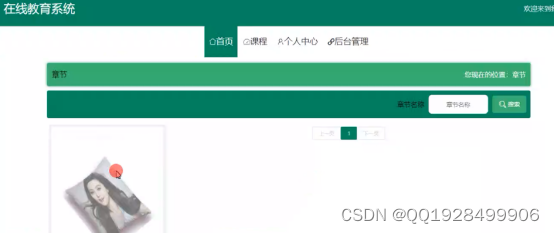
图5.8章节信息功能的实现界面
5.1.8课程订单管理功能的实现界面
学生可以管理已购买的课程。课程订单管理功能的实现界面如下图5.9所示:

图5.9课程订单管理功能的实现界面
5.2管理员功能的实现界面
管理员的功能为管理前台信息和更新前台信息以及管理学生、教师信息。管理的前台信息包括课程信息、章节信息、课程收藏信息、课程留言信息、课程订单信息等。管理员功能的实现界面如下图5.10所示:

图5.10管理员功能的实现界面
5.3教师功能的实现界面
教师的功能为管理个人资料和管理章节、课程信息以及回复学生留言、管理学生订单等。教师功能的实现界面如下图5.11所示:

图5.11教师功能的实现界面
第6章 系统测试
6.1系统测试的目的
系统开发完成以后相当于只是完成了一半的工作,还有最重要的一部分就是系统测试,系统测试的主要是目的检验开发的系统是否符合当初设定的需求,还有最重要的一点就是测试是否存在bug错误,要及时发现,及时解决,这样才能避免以后出现更大的问题。首先要检验最基础的语法语句是否错误,如果出现错误,系统运行时候回自动跳出相应的提示,这种错误比较容易发现,只要挨着每个功能点击测试就可以发现,然后方便纠正。而一些系统逻辑类的错误,就相对比较隐蔽,而且开发时候是站在自己的立场进行考虑的,有时候考虑不是很周到,所以这种问题就不方便发现,这种问题相对来说处理起来比较费时费力的,但是这种问题恰恰是最大的问题,这就是我们常说的bug,像一些大的科技公司,如果存在一个小小的bug那造成的损失都是无可限量的,所以测试的最重要的目的就是及时找到这种问题,然后进行解决。
6.2系统测试的重要性和方法
在软件开发工作中,不管到什么时候,不管开发什么软件,软件测试都占用最重要的一个位置,不管采用什么开发技术,什么研究方法,系统中总会出现各种不同的错误,我们要做的就是及时发现这些错误,及时的进行解决处理。测试是任何软件开发工作中最核心的一个单元,是软件开发的重要组成部分。根据统计,往往软件测试要占据整个开发工作量的百分之40以上,而测试成本也要占到总额的百分30到百分之50左右,从这里就可以很直观的看出来测试的重要性。
6.3系统的测试步骤
测试的时候也不是盲目的进行测试,也要有规划有步骤,这样才能起到更好的效果。一般系统都分为不同的权限不同的模块组成,一般在功能模块上就是测试系统的详细实施过程和编码时候是否有错误,然后查看是否符合系统需求说明,进一步完善和实施。测试的时候可以先进行一个小功能的测试,然后测试这个功能是否符合实际需求,已经有没有代码编写错误,然后在进行一个集成测试,就是把所有小功能都组装起来,然后测试每个功能之间的连接问题,看看是否存在不合逻辑的情况,有没有因为自己的疏忽,影响整个功能的运行,然后最后在进行一个确认测试,面向用户的形式进行,确认下是否符合系统需求。测试完功能以后,还要进行其他方面的测试,还要进行系统的性能测试,比如是否能满足同时使用,是否能超负荷,最好还要进行安全测试,是否需要进行安全验证,是否能保证数据安全,以及对不合理的数据怎么处理,这都是非常重要的一个环节,所以说软件测试是一个非常重要的工作,要考虑到方方面面,这样才能保证系统完整性,才能投入市场使用。
6.4系统的测试用例
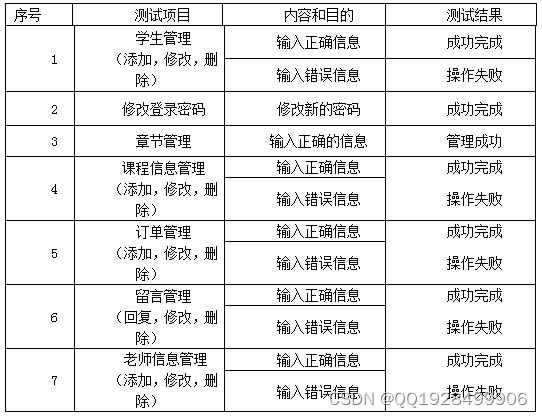
本系统的核心功能在于课程信息管理、用户信息管理、章节信息管理和在线购买课程、用户登录功能等上,所以在测试时主要针对这些功能进行测试。在测试时采用黑盒测试方法进行测试,按照编写的测试文档进行测试,测试完成后填写测试文档并进行对比,最终确定测试结果并完成系统总结。用户登录功能的测试表如下表6.1所示:
表6.1 用户登录功能测试表

按照用户登录功能的测试方法接着对其它功能进行测试,功能功能的测试表如下表6.2所示:
表6.2功能测试表
6.5测试总结
在测试中针对本系统的核心功能进行了详细测试,发现,本系统的功能都可以正确运行,本系统的逻辑也没有问题。虽然目前为止没有发现问题,但肯定还有很多没有发现的问题,有机会会继续完善的。
总 结
本次设计是关于在线教育的平台,主要实现了课程的在线学习和收藏以及问题的提问和用户之间的相互讨论交流、课程购买。本系统加入了章节信息管理和课程视频的在线播放,使学生的学习更加轻松。本系统采用B/S框架进行设计,可以提高项目的开发速度。在设计过程中不断进行功能完善和丰富界面,本系统可以帮助学生的课外学习,经过测试发现,本系统的运行稳定、功能完整。
本次设计是对我大学学习所有知识的总合,结合了多种技术,其中也包括多种本人自学的知识,比如photoshop和flsh等。通过本次设计完成了对我大学学习的成果检验,也让我认识到所学知识可以用来干什么。本基于VUE.js的在线教育系统虽然功能非常简单,但相对完整,在设计过程中所遇到的问题以及解决问题的方法都给我留下了深刻的印象。通过设计我才发现,自己还有很多的不足,需要补充的知识还有很多,老师所教授的知识仅仅只是入门,想要完成更大的项目需要更多的知识支持,学习的脚步并不会因为毕业而停止,我会继续学习。本次设计也让我对编程有了初步的认识,为今后参加工作奠定基础,我对未来充满期待。
致 谢
毕业总是快乐又忧伤的,快乐的是终于可以结束十几年的学习生涯去参加工作为社会做出贡献,忧伤的是马上要离开熟悉的学校、熟悉的老师、熟悉的同学。大学生活仿佛还在昨天,教室里的欢声笑语仿佛还在耳边,而我们却马上要离开学校。在此,感谢学校对我的培养,感谢同学在生活、学习中的陪伴,感谢老师对我的教育和包容。
本次毕业设计的完成离不开每位老师的精心指导,谢谢指导老师在我刚拿到课题时为我提供建议,才让我有了思路。谢谢开题老师的建议才让我顺利通过开题。谢谢答辩老师指导我答辩技巧才让我可以放心参加答辩。感谢每一位老师!
参考文献
[1]孙辉中.JAVA编程语言在计算机软件开发中的应用[J].网络安全技术与应用,2022(01):49-50.
[2]沙之洲.Java编程语言在计算机软件开发中的应用[J].电子世界,2021(24):125-127.DOI:10.19353/j.cnki.dzsj.2021.24.052.
[3]李雅琴.Java编程语言的优势及其应用实践研究[J].互联网周刊,2021(24):60-62.
[4]佟亚超.计算机软件Java编程特点及技术探析[J].技术与市场,2021,28(12):86-87+89.
[5]杨静莲,杨冠.网络平台下数学课程学习系统的研究与实现[J].现代职业教育,2021(50):110-111.
[6]Lee Stemkoski,James Cona. Developing Graphics Frameworks with Java and OpenGL[M].CRC Press:2021-11-24.
[7]赵学作.MySQL数据库主从数据同步的设置[J].网络安全和信息化,2021(11):94-97.
[8]Sufyan bin Uzayr. Mastering Java:A Beginner’s Guide[M].CRC Press:2021-11-01.
[9]王瑾,吕太之.基于Spring Boot+ Vue的学生评奖评优系统的设计与实现[J].电脑与电信,2021(10):52-55.DOI:10.15966/j.cnki.dnydx.2021.10.013.
[10]曹瑞燕.Java语言在软件开发中的应用[J].信息记录材料,2021,22(10):96-97.DOI:10.16009/j.cnki.cn13-1295/tq.2021.10.045.
[11]Gordon V Scott,Clevenger John L. Computer Graphics Programming in OpenGL with Java[M].Mercury Learning and Information:2021-09-02.
[12]Hsu Wen Chin,Gainsburg Julie. Hybrid and Non-Hybrid Block-Based Programming Languages in an Introductory College Computer-Science Course[J]. Journal of Educational Computing Research,2021,59(5):
[13]李爱超,赵霞,徐双.在线学习网站的研究与设计[J].信息记录材料,2021,22(05):138-139.DOI:10.16009/j.cnki.cn13-1295/tq.2021.05.075.
[14]苏霆.国家开放大学网络学习平台优化分析[J].科技资讯,2021,19(05):53-55.DOI:10.16661/j.cnki.1672-3791.2101-5042-4222.
[15]刘梦迪.计算机科学技术网站的设计分析[J].数码世界,2020(10):179-180.
[16]李兆翠.基于HTML5的在线学习系统的设计与实现[J].科技风,2018(36):102.DOI:10.19392/j.cnki.1671-7341.201836091.
[17]陈剑波.在线课程学习网站的建设与应用研究[J].安徽建筑,2018,24(02):230+271.DOI:10.16330/j.cnki.1007-7359.2018.02.095.
[18]沈岚岚.基于VUE.JS的多媒体在线学习网站的设计与实现[J].科技视界,2017(21):91+60.DOI:10.19694/j.cnki.issn2095-2457.2017.21.053.
[19]杨勇.适性教育:学习网站的设计与实现[J].新课程(综合版),2016(12):56-58.